
초보 코린이의 성장 일지
UE4 Console, Command 본문
명령을 Console를 통해 내려 동작을 하도록 구현해 볼 것이다.
더보기
#pragma once

#include "CoreMinimal.h"

class EXAMPLE_API FExampleConsoleCommand
{
public:
	FExampleConsoleCommand();
	~FExampleConsoleCommand();

private:
	// I가 붙었지만 클래스가 아닌 구조체이다.
	// 연결해줄 변수
	struct IConsoleCommand* Command;

private:
	void ExecuteCommand();
#include "ExampleConsoleCommand.h"
#include "GameFramework/Character.h"
#include "HAL/IConsoleManager.h"
#include "Misc/MessageDialog.h"
FExampleConsoleCommand::FExampleConsoleCommand()
{
// FConsoleCommandDelegate 매개변수가 없는 델리게이트
FConsoleCommandDelegate command = FConsoleCommandDelegate::CreateRaw(this, &FExampleConsoleCommand::ExecuteCommand);
// 커멘드명에는 띄어쓰기 사용 x,
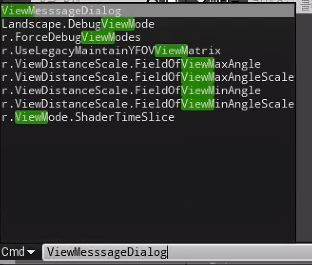
Command = IConsoleManager::Get().RegisterConsoleCommand(L"ViexMesssageDialog", L"Move actor to position(FVector)", command);
}
FExampleConsoleCommand::~FExampleConsoleCommand()
{
// 커멘드들이 등록되었는지 확인
if (!!Command)
IConsoleManager::Get().UnregisterConsoleObject(Command);
}
void FExampleConsoleCommand::ExecuteCommand()
{
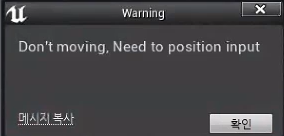
FText title = FText::FromString("Warning");
FText context = FText::FromString("Don't moving, Need to position input");
// 타이틀 제목에 들어갈 문자열 판단하기 위해 & 주소로 받으면된다.
FMessageDialog::Debugf(context, &title);
}
1. 입력시 입력한 로그 출력.
이번에는 원하는 값을 넣었을때 출력되도록 커멘드를 하나 더 추가해 보겠다.
더보기
#pragma once

#include "CoreMinimal.h"

class EXAMPLE_API FExampleConsoleCommand
{
public:
	FExampleConsoleCommand();
	~FExampleConsoleCommand();

private:
	// I가 붙었지만 클래스가 아닌 구조체이다.
	// 연결해줄 변수
	struct IConsoleCommand* Command;
	struct IConsoleCommand* Command2;


private:
	void ExecuteCommand();

};
#include "ExampleConsoleCommand.h"
#include "GameFramework/Character.h"
#include "HAL/IConsoleManager.h"
#include "Misc/MessageDialog.h"
FExampleConsoleCommand::FExampleConsoleCommand()
{
// FConsoleCommandDelegate 매개변수가 없는 델리게이트
FConsoleCommandDelegate command = FConsoleCommandDelegate::CreateRaw(this, &FExampleConsoleCommand::ExecuteCommand);
// 커멘드명에는 띄어쓰기 사용 x,
Command = IConsoleManager::Get().RegisterConsoleCommand(L"ViexMesssageDialog", L"Move actor to position(FVector)", command);
FConsoleCommandWithArgsDelegate command2;
command2.BindLambda([&](const TArray<FString>& InArgs)// 람다식 사용, 외부변수 &로 모두 받는다.
{
FString content;
for (FString str : InArgs)
content += ", " + str;
FMessageDialog::Debugf(FText::FromString(content));
});
Command2 = IConsoleManager::Get().RegisterConsoleCommand(L"ViexMesssageArgs", L"Move actor to position(FVector)", command2);
}
FExampleConsoleCommand::~FExampleConsoleCommand()
{
// 커멘드들이 등록되었는지 확인
if (!!Command)
IConsoleManager::Get().UnregisterConsoleObject(Command);
if (!!Command2)
IConsoleManager::Get().UnregisterConsoleObject(Command2);
}
void FExampleConsoleCommand::ExecuteCommand()
{
FText title = FText::FromString("Warning");
FText context = FText::FromString("Don't moving, Need to position input");
// 타이틀 제목에 들어갈 문자열 판단하기 위해 & 주소로 받으면된다.
FMessageDialog::Debugf(context, &title);
}
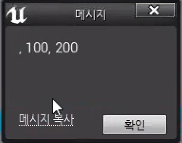
1. 입력한 값을 그대로 출력.
수치를 조정해서 캐릭터 위치를 옮겨보도록 해보겠다.
더보기
#pragma once

#include "CoreMinimal.h"

class EXAMPLE_API FExampleConsoleCommand
{
public:
	FExampleConsoleCommand();
	~FExampleConsoleCommand();

private:
	// I가 붙었지만 클래스가 아닌 구조체이다.
	// 연결해줄 변수
	struct IConsoleCommand* Command;
	struct IConsoleCommand* Command2;
	struct IConsoleCommand* Command3;


private:
	void ExecuteCommand();
	// 게임상에 World return 해준다.
	void ExecuteCommand3(const TArray<FString>& InArgs, UWorld* InWorld);

};
#include "ExampleConsoleCommand.h"
#include "GameFramework/Character.h"
#include "HAL/IConsoleManager.h"
#include "Misc/MessageDialog.h"
FExampleConsoleCommand::FExampleConsoleCommand()
{
// FConsoleCommandDelegate 매개변수가 없는 델리게이트
FConsoleCommandDelegate command = FConsoleCommandDelegate::CreateRaw(this, &FExampleConsoleCommand::ExecuteCommand);
// 커멘드명에는 띄어쓰기 사용 x,
Command = IConsoleManager::Get().RegisterConsoleCommand(L"ViexMesssageDialog", L"Move actor to position(FVector)", command);
FConsoleCommandWithArgsDelegate command2;
command2.BindLambda([&](const TArray<FString>& InArgs)// 람다식 사용, 외부변수 &로 모두 받는다.
{
FString content;
for (FString str : InArgs)
content += ", " + str;
FMessageDialog::Debugf(FText::FromString(content));
});
Command2 = IConsoleManager::Get().RegisterConsoleCommand(L"ViexMesssageArgs", L"Move actor to position(FVector)", command2);
FConsoleCommandWithWorldAndArgsDelegate command3;
command3.BindRaw(this, &FExampleConsoleCommand::ExecuteCommand3);
Command3 = IConsoleManager::Get().RegisterConsoleCommand(L"MoveToPlayer", L"Move player to position(FVector)", command3);
}
FExampleConsoleCommand::~FExampleConsoleCommand()
{
// 커멘드들이 등록되었는지 확인
if (!!Command)
IConsoleManager::Get().UnregisterConsoleObject(Command);
if (!!Command2)
IConsoleManager::Get().UnregisterConsoleObject(Command2);
if (!!Command3)
IConsoleManager::Get().UnregisterConsoleObject(Command3);
}
void FExampleConsoleCommand::ExecuteCommand()
{
FText title = FText::FromString("Warning");
FText context = FText::FromString("Don't moving, Need to position input");
// 타이틀 제목에 들어갈 문자열 판단하기 위해 & 주소로 받으면된다.
FMessageDialog::Debugf(context, &title);
}
void FExampleConsoleCommand::ExecuteCommand3(const TArray<FString>& InArgs, UWorld* InWorld)
{
// 포지션 100, 200, 300
if (InArgs.Num() != 1)
{
GLog->Log("FVector format required input");
return;
}
// 문자열 자르기.
TArray<FString> strs;
InArgs[0].ParseIntoArray(strs, L",");
FVector position;
position.X = FCString::Atof(*strs[0]);
position.Y = FCString::Atof(*strs[1]);
position.Z = FCString::Atof(*strs[2]);
// 명령창을 통해서 콜을 해주는 것이므로, 게임모드인지 구분할수 있다.
// 에디터나 버튼에서는 구분 못한다. 명령창에서만 가능
if (FApp::IsGame())
{
// 게임모드일때는 플레이어가 빙의되어있을 것, 컨트롤러가 반드시 존재하므로,
// 빙의된 캐릭터를 찾아준다. 그게 Player
APlayerController* controller = InWorld->GetFirstPlayerController<APlayerController>();
ACharacter* character = controller->GetPawn<ACharacter>();
// 포지션으로 이동시켜준다.
character->SetActorLocation(position);
return;
}
// 에디터 월드, 현재 에디터 상에 열려있는 레벨
for (AActor* actor : InWorld->GetCurrentLevel()->Actors)
{
// Actor Name이 PlayerStart를 포함하고 있다면,
if (!!actor && actor->GetName().Contains("PlayerStart"))
actor->SetActorLocation(position); // 포지션으로 Player 이동시킴.
}
}
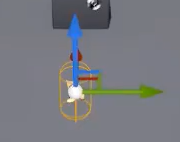

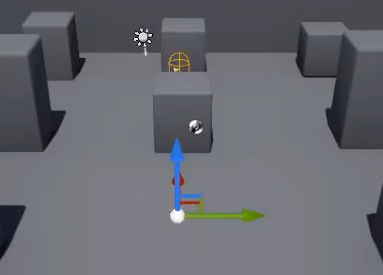
1. 명령에 의하여 플레이어가 포지션에 따라 이동되는걸 볼 수 있다.
2. 게임모드일때나 아닐때 둘다 명령에 의해 이동이 가능하다.
자료형을 가지고 다양한 기능을 수행해 볼 것이다.

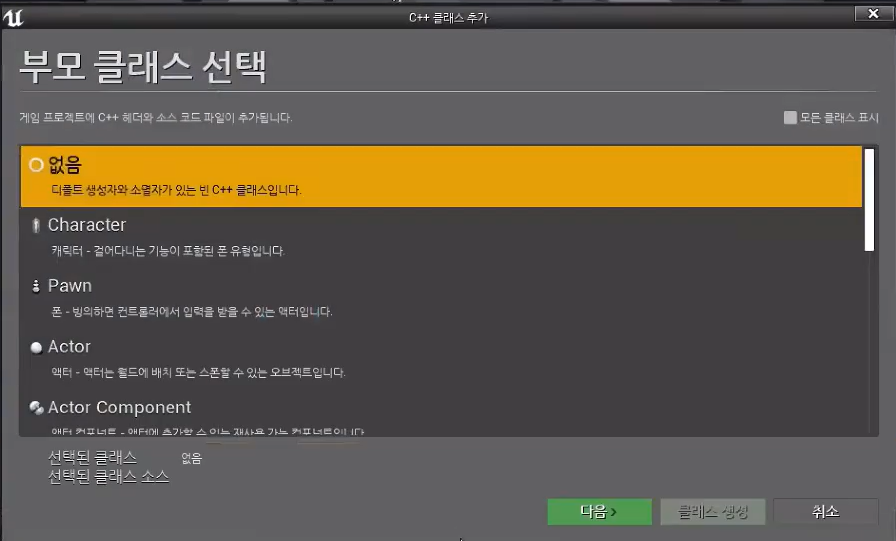
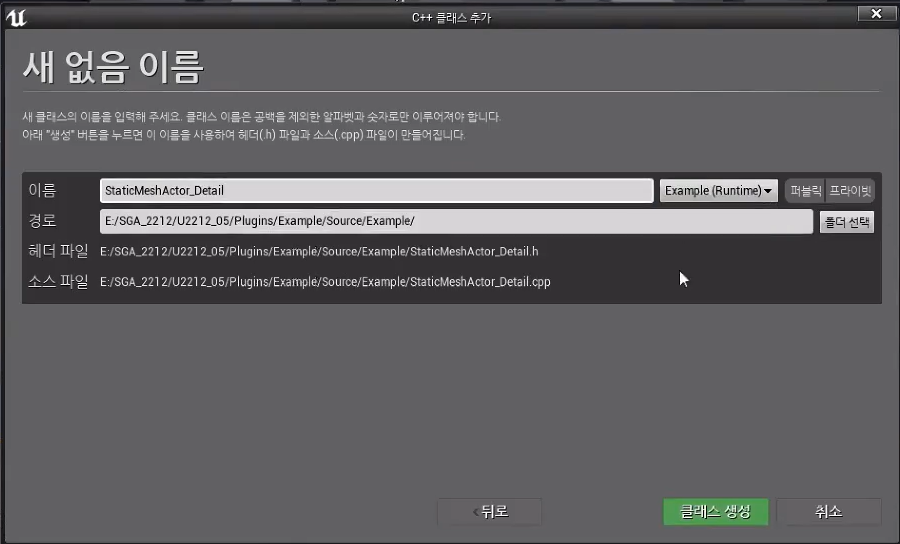
1. 클래스를 하나 생성해준다.
2. 월드에 배치되어있는 StaticMesh들을 편집해볼 것이다.
더보기
#pragma once

#include "CoreMinimal.h"
#include "IDetailCustomization.h"

// 싱글톤으로 만들거라 생성, 소멸자 제거
class EXAMPLE_API FStaticMeshActor_Detail
	: public IDetailCustomization
{

public:
	static TSharedRef<IDetailCustomization> MakeInstance();

public:
	void CustomizeDetails(IDetailLayoutBuilder& DetailBuilder) override;
};
#include "ExampleModule.h"
#include "ExampleDubuggerCategory.h"
#include "ExampleConsoleCommand.h"
#include "StaticMeshActor_Detail.h"
#include "Engine/StaticMeshActor.h"
#include "GameplayDebugger.h" // 언리얼 헤더
#define LOCTEXT_NAMESPACE "FExampleModule"
IMPLEMENT_MODULE(FExampleModule, Example)
void FExampleModule::StartupModule()
{
// Debugger
{
IGameplayDebugger::FOnGetCategory category;
// 선언과 함께 초기화하려면 Create 사용, 그게 아니라면 Bind 사용
category.BindStatic(&FExampleDubuggerCategory::MakeInstance); // static로 객체가 필요없으므로 주소만 넣어준다.
// 싱글톤 Get(), Delegete 이므로 이벤트이다.
// OnGet이 붙으면, static를 MakeInstance로 return 해준다고 생각하면 된다.
// EGameplayDebuggerCategoryState 어떠한 상황에서 활성화 할껀지 체크
// 마지막 매개변수는 슬롯으로 내가 원하는 번호에 할당한다.
IGameplayDebugger::Get().RegisterCategory("Example", category, EGameplayDebuggerCategoryState::EnabledInGameAndSimulate, 5);
IGameplayDebugger::Get().NotifyCategoriesChanged();
}
// Console Command
{
// 객체 동적할당 MakeShareable
ConsoleCommand = MakeShareable(new FExampleConsoleCommand());
}
// Property Editor - StaticMeshActor
{
// 싱글톤으로 만들어질 객체
FOnGetDetailCustomizationInstance instance;
instance.BindStatic(&FStaticMeshActor_Detail::MakeInstance);
// 모듈에 붙는다.
FPropertyEditorModule& prop = FModuleManager::LoadModuleChecked<FPropertyEditorModule>("PropertyEditor");
// 문자열 틀리면 위험하기 때문에 StaticClass() 사용하여 타입 return 해준다
prop.RegisterCustomClassLayout(AStaticMeshActor::StaticClass()->GetFName(), instance);
}
}
void FExampleModule::ShutdownModule()
{
// 항상 할당을 했으면, 제거되어야 하는게 있는지 반드시 확인해줘야한다.
// 그렇지 않으면 에디터상에 항상 남아있는다.
if (IGameplayDebugger::IsAvailable())
IGameplayDebugger::Get().UnregisterCategory("Example"); // 카테고리에서 해제
// 스마트포인터는 자동제거가 되지만, 혹시 모르기 때문에 Reset로 제거해준다.
if (ConsoleCommand.IsValid())
ConsoleCommand.Reset();
}
#undef LOCTEXT_NAMESPACE#pragma once
#include "CoreMinimal.h"
#include "IDetailCustomization.h"
// 싱글톤으로 만들거라 생성, 소멸자 제거
class EXAMPLE_API FStaticMeshActor_Detail
: public IDetailCustomization
{
public:
static TSharedRef<IDetailCustomization> MakeInstance();
public:
void CustomizeDetails(IDetailLayoutBuilder& DetailBuilder) override;
};#include "StaticMeshActor_Detail.h"
TSharedRef<IDetailCustomization> FStaticMeshActor_Detail::MakeInstance()
{
// 자신의 자료형 return 해준다.
return MakeShareable(new FStaticMeshActor_Detail());
}
void FStaticMeshActor_Detail::CustomizeDetails(IDetailLayoutBuilder& DetailBuilder)
{
}1. 싱글톤으로 Static 객체를 찾아서 모듈을 붙여주고, 원하는 기능이 적용되도록 만드는 사전 단계.
https://www.youtube.com/watch?v=KuDkXEVnzs4
'언리얼' 카테고리의 다른 글
| UE4 StaticMesh (0) | 2023.04.11 |
|---|---|
| UE4 StaticMesh (0) | 2023.04.06 |
| UE4 DrawDebugLine (0) | 2023.04.04 |
| UE4 Slate UI, Plug In (0) | 2023.04.03 |
| UE4 FPS IK, Pistol (0) | 2023.04.01 |
'언리얼' Related Articles
more


Comments