
초보 코린이의 성장 일지
UE4 SubAction Warp, Top View 본문
Perspective(원근투영)이 아닌 Orthographic(직교투영)을 사용해서 Top View 시점전환을 Warp에 적용해 볼 것이다.


1. 카메라를 에디터 맵에 올려놓고, 설정을 Orthographic으로 변경해서 보면 직교투영한 상태처럼 보이게 된다.


1. SubAction을 상속받아 클래스를 하나 만들어준다.
#pragma once

#include "CoreMinimal.h"
#include "Weapons/CSubAction.h"
#include "CSubAction_Warp.generated.h"

UCLASS(Blueprintable)
class U2212_06_API UCSubAction_Warp : public UCSubAction
{
	GENERATED_BODY()

private:
    UPROPERTY(EditDefaultsOnly, Category = "Camera")
        TSubclassOf<class ACameraActor> CameraActorClass; // 변경할 카메라

    UPROPERTY(EditDefaultsOnly, Category = "Camera")
        FVector CameraRelativeLocation = FVector(0, 0, 1000); // 캐릭터에 붙은 카메라, 캐릭터로부터 수직 간격

    UPROPERTY(EditDefaultsOnly, Category = "Camera")
        TEnumAsByte<ECameraProjectionMode::Type> ProjectionMode; // 오소그래픽(직교투영)

    UPROPERTY(EditDefaultsOnly, Category = "Camera")
        float OrthoWidth = 2000; // 오소에서는 Width로 화면크기가 결정된다.

    UPROPERTY(EditDefaultsOnly, Category = "Camera")
        float FieldOfView = 90;

    UPROPERTY(EditDefaultsOnly, Category = "Camera")
        float BlendIn = 0; // 카메라 전환되기까지 시간

    UPROPERTY(EditDefaultsOnly, Category = "Camera")
        float BlendOut = 0; // In에 반대

public:
    UCSubAction_Warp();

public:
    virtual void Pressed() override;
    virtual void Released() override;

public:
    void BeginPlay(class ACharacter* InOwner, class ACAttachment* InAttachment, class UCDoAction* InDoAction) override;

public:
    void Tick_Implementation(float InDeltaTime) override;

private:
    class APlayerController* PlayerController;
    class ACameraActor* CameraActor; // 생성할 카메라 Spawn 결과 저장


};
#include "Weapons/SubActions/CSubAction_Warp.h"
#include "Global.h"
#include "GameFramework/Character.h"
#include "GameFramework/PlayerController.h"
#include "Components/CStateComponent.h"
#include "Components/CMovementComponent.h"
#include "Camera/CameraActor.h"
#include "Camera/CameraComponent.h"
UCSubAction_Warp::UCSubAction_Warp()
{
// 다른 상속받아서 구현할수도 있으므로 Null을 넣는것보단, 기본자료형으로 선언
CameraActorClass = ACameraActor::StaticClass();
}
void UCSubAction_Warp::BeginPlay(ACharacter* InOwner, ACAttachment* InAttachment, UCDoAction* InDoAction)
{
Super::BeginPlay(InOwner, InAttachment, InDoAction);
PlayerController = InOwner->GetController<APlayerController>();
CameraActor = InOwner->GetWorld()->SpawnActor<ACameraActor>(CameraActorClass);
CameraActor->SetActorRotation(FRotator(-90, 0, 0)); // 위에서 아래를 바라봐야 하므로, 회전시켜준다.
UCameraComponent* camera = CHelpers::GetComponent<UCameraComponent>(CameraActor); // 세팅해주기.
camera->ProjectionMode = ProjectionMode;
camera->OrthoWidth = OrthoWidth;
camera->FieldOfView = FieldOfView;
}
void UCSubAction_Warp::Pressed()
{
CheckNull(PlayerController);
CheckTrue(State->IsSubActionMode());
Super::Pressed();
State->OnSubActionMode();
// 전환 시간을 활용하기위해 WithBlend 사용, 카메라 전환
PlayerController->SetViewTargetWithBlend(CameraActor, BlendIn);
}
void UCSubAction_Warp::Released()
{
CheckNull(PlayerController);
CheckFalse(State->IsSubActionMode());
Super::Released();
// Pressed와 반대,
State->OffSubActionMode();
// 카메라를 가지고있는 Actor인 Owner을 넣어주면서 바뀐 카메라를 다시 돌려준다.
PlayerController->SetViewTargetWithBlend(Owner, BlendIn);
}
void UCSubAction_Warp::Tick_Implementation(float InDeltaTime)
{
Super::Tick_Implementation(InDeltaTime);
CheckNull(PlayerController);
CheckNull(CameraActor);
// 카메라 위치 세팅.
CameraActor->SetActorLocation(Owner->GetActorLocation() + CameraRelativeLocation);
}1. 가로수치를 세로수치로 나눠보면, 비율이 나오게된다. 이때 화면에 크기가 결정되는 방법을 Orthographic에 적용해서
그 화면 그대로를 송출하도록 만들어 줄 것이다.
2. 비율을 정해주고, 키를 눌렀을때, 땟을때 카메라 전환을 시켜준다.


1. Ratio가 1.777인 수치는 해상도 1920 / 1080을 해보면 1,777778 수치가 나오면서, 비율을 나타낸다.
2. Orthographic로 변경해준다.
3. Near안에 존재하거나 FarClipPlane 범위를 벗어나면 화면에 그리지 않는다.


1. BP로 생성해준다.

1. SubAction에 선택해준다.

1. Perspective로 먼저 어떻게 보이는지 확인해 볼 것이다.

1. Perspective에 시점은 위에 보이는것처럼 나오게된다.
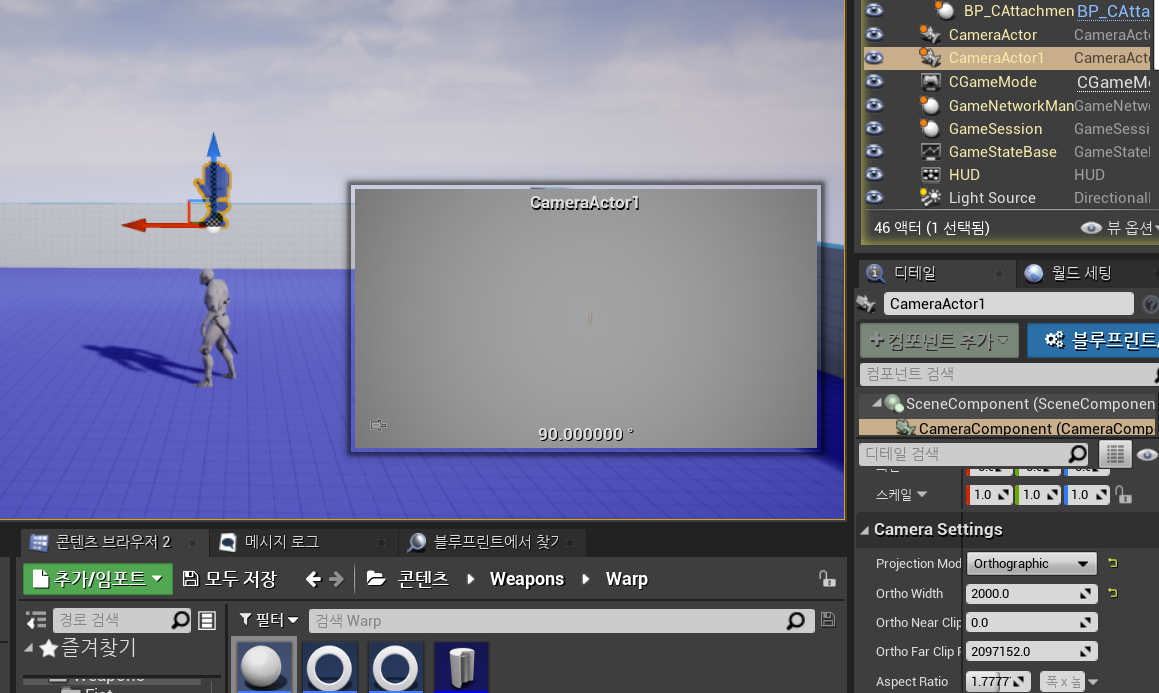
1. Orthographic로 보면 잘 보이지는 않지만, Player가 서있는 하나의 모습이 담겨져 보인다.
2. 바닥에 색때문에 회색처럼 보인다. 랜더링을 안해주기 때문 그게 아니라면 제대로된 직교투영이 된다.
3. BeginPlayer일때 Orthographic을 먼저 설정해주고, Perspective로 바꿔주면 깊이차가 사라져서 이상하게 보이는 현상이 사라진다. 알면 좋은 정보.


1. 여기서 하나의 문제가 발생하는데 캐릭터가 회전을 하고 움직이게되면 방향이 변경되어 버린다. 앞으로 눌렀는데 오른쪽으로 이동한다던가 문제가 생기는데 이유가 있다.
2. 카메라는 위에서 똑같은 각도로 보고있고, 캐릭터는 절대방향으로 이동하기 때문에 각도가 틀어져도 카메라는 알 수가 없다. 동일하게 카메라도 캐릭터를 따라갈 수 있도록 변경해 줄 것이다.
#pragma once

#include "CoreMinimal.h"
#include "Components/ActorComponent.h"
#include "CMovementComponent.generated.h"

public:

	FORCEINLINE void EnableTopViewCamera() { bTopViewCamera = true; }
	FORCEINLINE void DisableTopViewCamera() { bTopViewCamera = false; }

public:
	// 캐릭터 이동할 함수
	void OnMoveForward(float InAxis);
	void OnMoveRight(float InAxis);

private:
	bool bTopViewCamera; // Top View 일때,

};
#include "Components/CMovementComponent.h"
#include "Global.h"
#include "GameFramework/Character.h"
#include "GameFramework/CharacterMovementComponent.h"
void UCMovementComponent::OnMoveForward(float InAxis)
{
CheckFalse(bCanMove);
FRotator rotator = FRotator(0, OwnerCharacter->GetControlRotation().Yaw, 0);
FVector direction = FQuat(rotator).GetForwardVector();
if (bTopViewCamera)
direction = FVector::XAxisVector; // TopView카메라라면, X 절대방향
OwnerCharacter->AddMovementInput(direction, InAxis);
}
void UCMovementComponent::OnMoveRight(float InAxis)
{
CheckFalse(bCanMove);
FRotator rotator = FRotator(0, OwnerCharacter->GetControlRotation().Yaw, 0);
FVector direction = FQuat(rotator).GetRightVector();
if (bTopViewCamera)
direction = FVector::YAxisVector; // TopView카메라라면, Y 절대방향
OwnerCharacter->AddMovementInput(direction, InAxis);
}1. bool을 통해서 TopView 카메라일때 절대방향으로 이동할 수 있도록 설정.
#include "Weapons/SubActions/CSubAction_Warp.h"
#include "Global.h"
#include "GameFramework/Character.h"
#include "GameFramework/PlayerController.h"
#include "Components/CStateComponent.h"
#include "Components/CMovementComponent.h"
#include "Camera/CameraActor.h"
#include "Camera/CameraComponent.h"

void UCSubAction_Warp::Pressed()
{
	CheckNull(PlayerController);
	CheckTrue(State->IsSubActionMode());

	Super::Pressed();

	State->OnSubActionMode();
	Movement->EnableTopViewCamera();
	// 전환 시간을 활용하기위해 WithBlend 사용, 카메라 전환
	PlayerController->SetViewTargetWithBlend(CameraActor, BlendIn);

}

void UCSubAction_Warp::Released()
{
	CheckNull(PlayerController);
	CheckFalse(State->IsSubActionMode());

	Super::Released();

	// Pressed와 반대,
	State->OffSubActionMode();
	Movement->DisableTopViewCamera();
	// 카메라를 가지고있는 Actor인 Owner을 넣어주면서 바뀐 카메라를 다시 돌려준다.
	PlayerController->SetViewTargetWithBlend(Owner, BlendIn);

}
1. Movement로 만들어준 TopViewCamera를 넣어준다.
https://www.youtube.com/watch?v=AffMgfgCh4w
'언리얼' 카테고리의 다른 글
| UE4 SubAction Around Skill (0) | 2023.07.04 |
|---|---|
| UE4 SubAction Around Skill (0) | 2023.07.03 |
| UE4 SubAction Warp (0) | 2023.06.29 |
| UE4 SubAction Hammer Skill (0) | 2023.06.27 |
| UE4 SubAction Sword Skill Collision, Hammer Init (0) | 2023.06.26 |


