
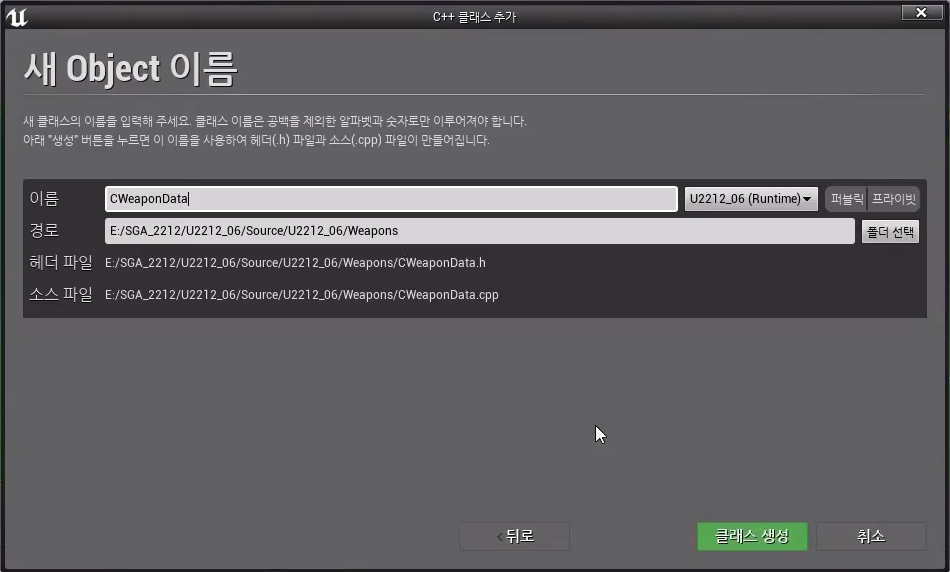
초보 코린이의 성장 일지
UE4 Behavior, AI Action 본문
AI Enemy들이 Equip에 대한 오류가 발생하였다. 이를 해결해주기 위한 방법이 존재한다.
만약 Sword를 Enemy가 장착한다고 가정하고 이야기해 보겠다.
WeaponAsset라는 클래스에 Sowrd에 객체 정보와 생성을 동시에 했다면, WeaponAsset는 이제 정보만을 가지고 있고, WeaponData라는 클래스를 하나 더 만들어줘서 이 곳에서 생성을 하게 만들어 준다. 그리고 Player와 Enemy에서 각자 생성을 하게끔 분리해주면 된다.
또한 생성을 해주는 곳에서 다른 클래스들이 접근을 못하게 막아주고, 생성이 완료되면 Friend로 엮여있는 클래스에만 열어주고 return 시켜서 보내주는 방법으로, 생성을 시켜줄 것이다.
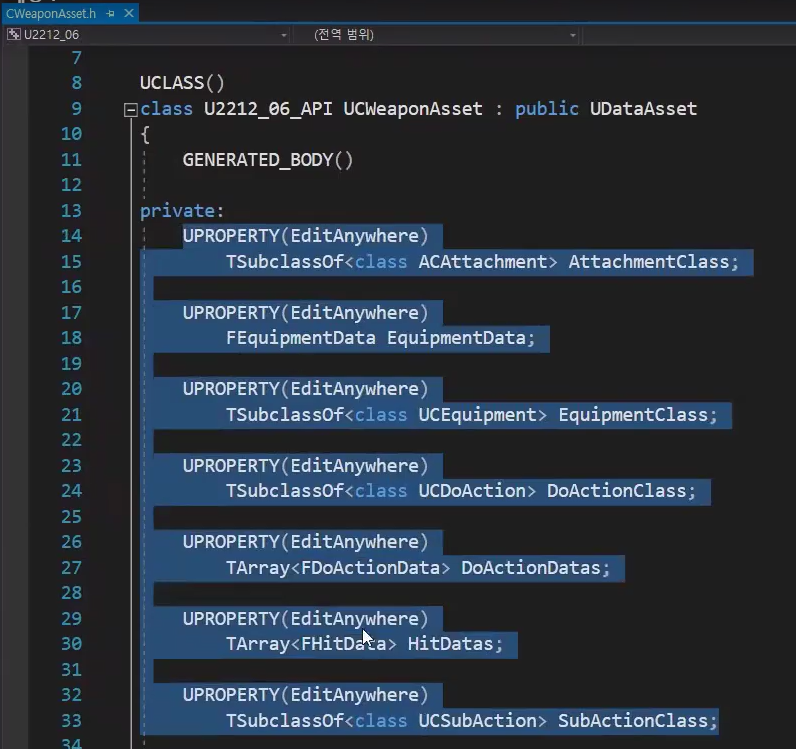
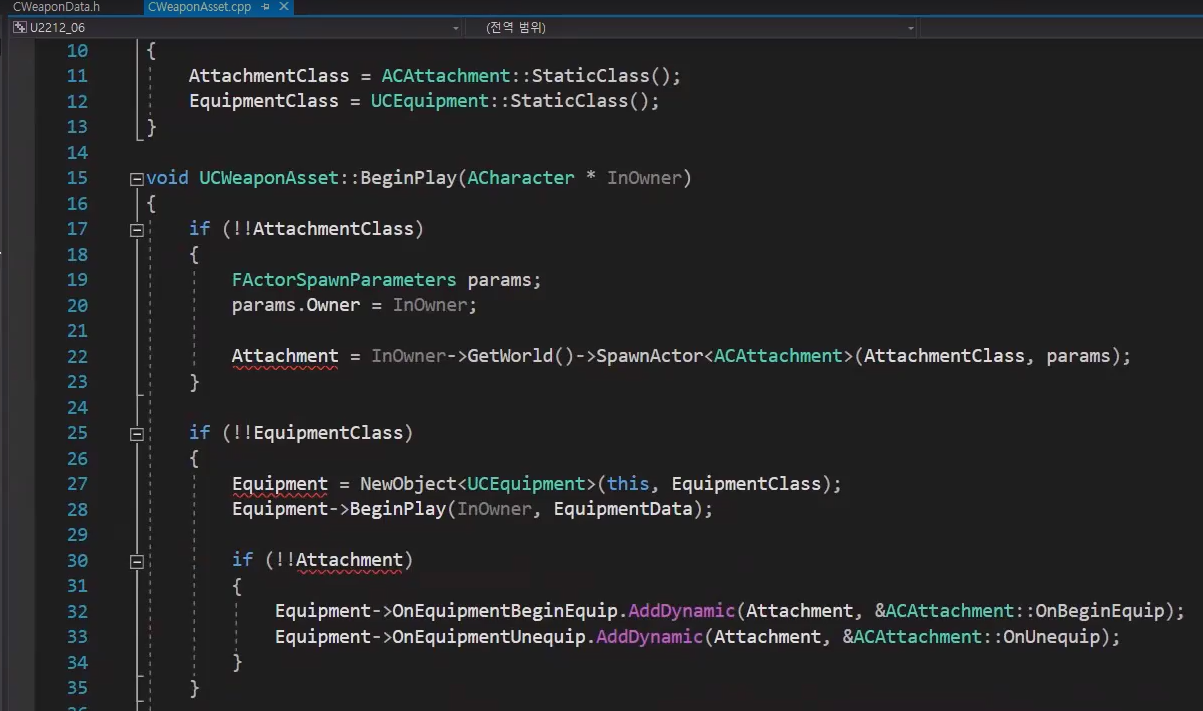
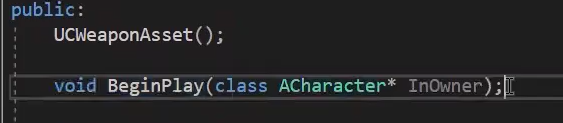
1. WeaponAsset에서 위에 보이는 바와 같이 생성 정보들을 나타낸다.
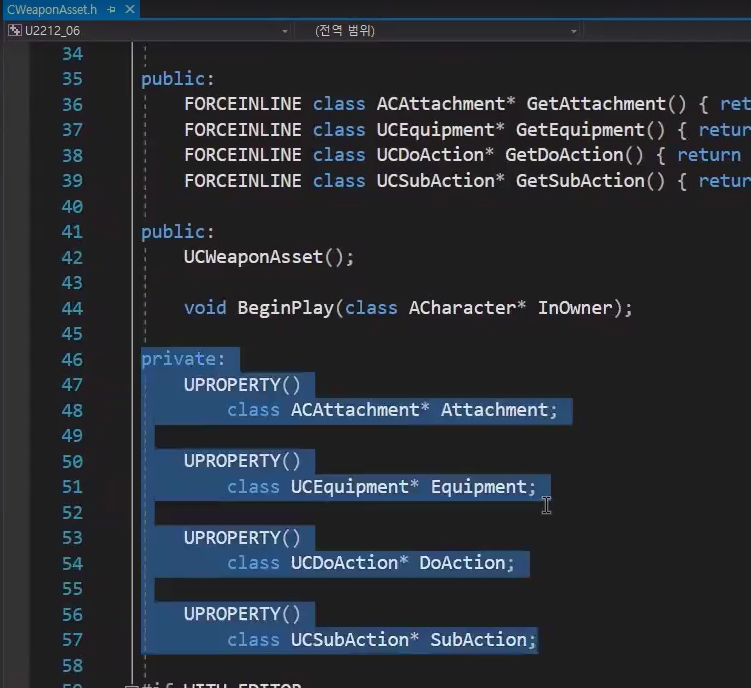
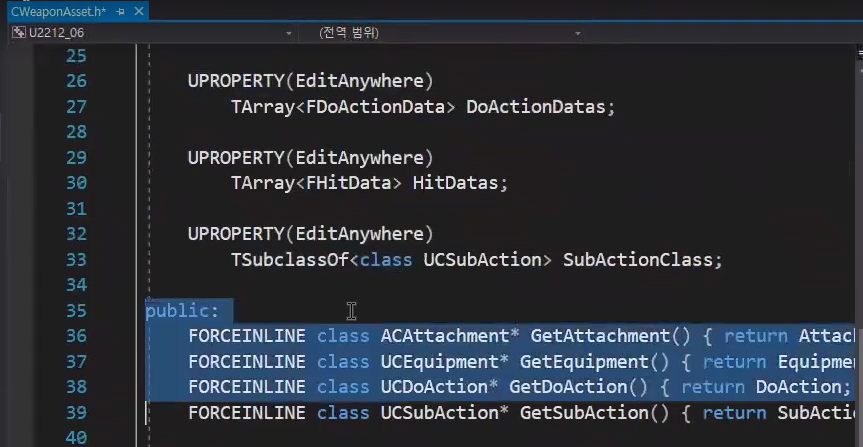
1. 아래에 있는 생성을 관여해주는 부분들이 WeaponAsset -> WeaponData 넘어가게 될 것이다.
#pragma once

#include "CoreMinimal.h"
#include "UObject/NoExportTypes.h"
#include "CWeaponData.generated.h"

UCLASS()
class U2212_06_API UCWeaponData : public UObject
{
	GENERATED_BODY()

private:
	friend class UCWeaponAsset;

public:
	// 생성된걸 return 해주기 위해
	FORCEINLINE class ACAttachment* GetAttachment() { return Attachment; }
	FORCEINLINE class UCEquipment* GetEquipment() { return Equipment; }
	FORCEINLINE class UCDoAction* GetDoAction() { return DoAction; }
	FORCEINLINE class UCSubAction* GetSubAction() { return SubAction; }

private:
	// UObject로부터 상속을 받았기 때문에 생명주기로 관리를 받지 않는다.
	// 그래서 가비지 컬렉터가 조금이라도 사용을 하지 않는다고 판단하면, 임의로 제거시켜버린다.
	// 직렬화를 넣어주게 되면, 직렬화된 상태로 판단하고 가비지 컬렉터가 사용자가 제거하기 전까지 물고 있어주기 때문에 제거되지 않는다.
	UPROPERTY()
		class ACAttachment* Attachment;

	UPROPERTY()
		class UCEquipment* Equipment;

	UPROPERTY()
		class UCDoAction* DoAction;

	UPROPERTY()
		class UCSubAction* SubAction;

};
#include "Weapons/CWeaponData.h"1. WeaponAsset에서 넘겨받은 객체들을 옮겨준다.
2. WeaponAsset만 접근이 가능하도록 Friend로 설정.
1. WeaponAsset에서 객체들이 빠지면서 오류가 발생한 부분의 코드들을 직접적으로 안에서 생성해주고, 변경해준다.
#include "Weapons/CWeaponAsset.h"
#include "Global.h"
#include "CAttachment.h"
#include "CEquipment.h"
#include "CDoAction.h"
#include "CSubAction.h"
#include "CWeaponData.h"
#include "GameFramework/Character.h"
UCWeaponAsset::UCWeaponAsset()
{
// 기본값으로 StaticClass를 넣어준다.
AttachmentClass = ACAttachment::StaticClass();
EquipmentClass = UCEquipment::StaticClass();
//DoActionClass = UCDoAction::StaticClass();
}
void UCWeaponAsset::BeginPlay(ACharacter * InOwner, UCWeaponData** OutWeaponData)
{
ACAttachment* attachment = nullptr;
if (!!AttachmentClass)
{
FActorSpawnParameters params;
params.Owner = InOwner;
// 선택이 되어있다면 붙여주기.
attachment = InOwner->GetWorld()->SpawnActor<ACAttachment>(AttachmentClass, params);
}
UCEquipment* equipment = nullptr;
if (!!EquipmentClass)
{
// Object 동적할당, 실제로 만들어질 EquipmentClass
equipment = NewObject<UCEquipment>(this, EquipmentClass);
equipment->BeginPlay(InOwner, EquipmentData);
if (!!attachment)
{
// 델리게이션을 불러, 무기 연결
equipment->OnEquipmentBeginEquip.AddDynamic(attachment, &ACAttachment::OnBeginEquip);
equipment->OnEquipmentUnequip.AddDynamic(attachment, &ACAttachment::OnUnequip);
}
}
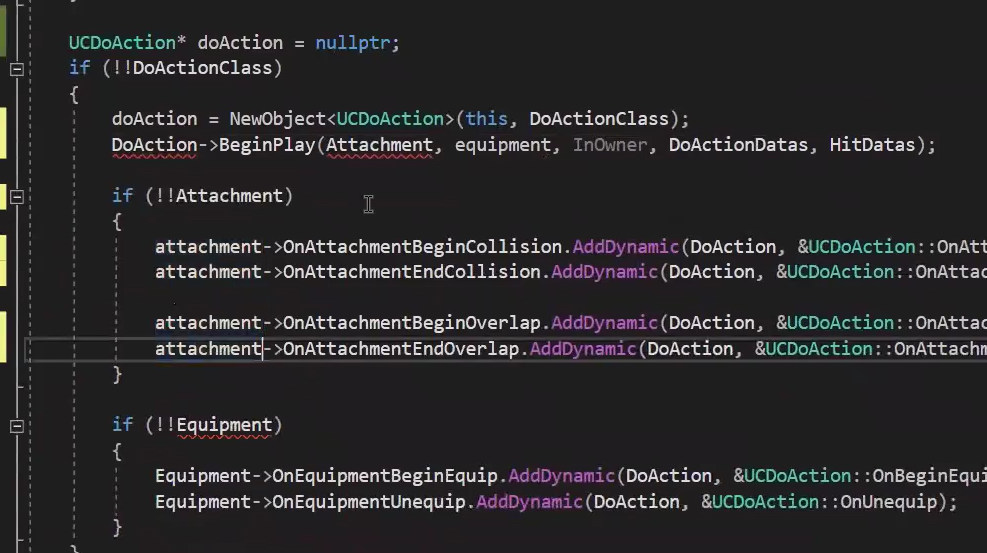
UCDoAction* doAction = nullptr;
if (!!DoActionClass)
{
// DoAction 생성
doAction = NewObject<UCDoAction>(this, DoActionClass);
doAction->BeginPlay(attachment, equipment, InOwner, DoActionDatas, HitDatas);
if (!!attachment)
{
// null이 아니라면, Attachment에 DoAction꺼를 다 연결해준다.
attachment->OnAttachmentBeginCollision.AddDynamic(doAction, &UCDoAction::OnAttachmentBeginCollision);
attachment->OnAttachmentEndCollision.AddDynamic(doAction, &UCDoAction::OnAttachmentEndCollision);
attachment->OnAttachmentBeginOverlap.AddDynamic(doAction, &UCDoAction::OnAttachmentBeginOverlap);
attachment->OnAttachmentEndOverlap.AddDynamic(doAction, &UCDoAction::OnAttachmentEndOverlap);
}
if (!!equipment)
{
// Equipment에 DoAction를 연결해준다.
equipment->OnEquipmentEquip.AddDynamic(doAction, &UCDoAction::OnBeginEquip);
equipment->OnEquipmentUnequip.AddDynamic(doAction, &UCDoAction::OnUnequip);
}
}
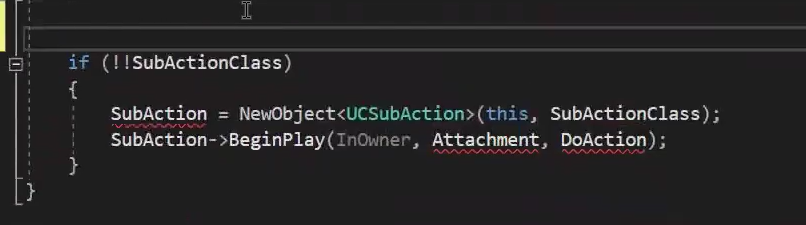
UCSubAction* subAction = nullptr;
if (!!SubActionClass)
{
subAction = NewObject<UCSubAction>(this, SubActionClass);
subAction->BeginPlay(InOwner, attachment, doAction);
}
// 값들을 다 넣어준다.
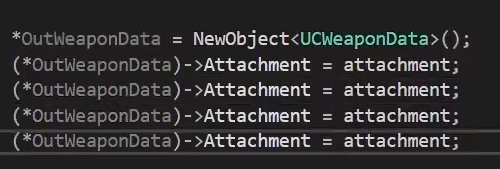
*OutWeaponData = NewObject<UCWeaponData>();
(*OutWeaponData)->Attachment = attachment;
(*OutWeaponData)->Equipment = equipment;
(*OutWeaponData)->DoAction = doAction;
(*OutWeaponData)->SubAction = subAction;
}
#if WITH_EDITOR
void UCWeaponAsset::PostEditChangeChainProperty(FPropertyChangedChainEvent& PropertyChangedEvent)
{
// 게임모듈 쪽이므로 Super 사용 가능. PropertyChangedEvent가 중요하다
//// GetPropertyName 어떤 변수가 바뀌었는지 확인할 수 있다.
//CLog::Log(PropertyChangedEvent.GetPropertyName().ToString());
//// 어떤 명령에 의해서 바뀌었는지 확인, ChangeType는 직렬화가 안되어있으므로 int로 출력해준다.
//CLog::Log((int32)PropertyChangedEvent.ChangeType);
Super::PostEditChangeChainProperty(PropertyChangedEvent);
CheckTrue(FApp::IsGame()); // 런타임쪽이므로, 현재 게임이 실행중인지 체크
bool bRefresh = false;
// 새로고침할 조건, 수정하려는 변수명이 0과 같다면 동일하다는 의미
bRefresh |= PropertyChangedEvent.GetPropertyName().Compare("DoActionDatas") == 0;
bRefresh |= PropertyChangedEvent.GetPropertyName().Compare("HitDatas") == 0;
if (bRefresh)
{
bool bCheck = false;
bCheck |= PropertyChangedEvent.ChangeType == EPropertyChangeType::ArrayAdd; // 추가
bCheck |= PropertyChangedEvent.ChangeType == EPropertyChangeType::ArrayRemove; // 지우기
bCheck |= PropertyChangedEvent.ChangeType == EPropertyChangeType::ArrayClear; // 삭제
bCheck |= PropertyChangedEvent.ChangeType == EPropertyChangeType::Duplicate; // 복제
if (bCheck)
{
// 모듈을 불러주는 공간
FPropertyEditorModule& prop = FModuleManager::LoadModuleChecked<FPropertyEditorModule>("PropertyEditor");
// IDetailsView 공간에서 찾아오기.
TSharedPtr<IDetailsView> detailsView = prop.FindDetailView("WeaponAssetEditorDetailsView");
if (detailsView.IsValid())
detailsView->ForceRefresh(); // 정상적으로 불려졌다면 새로 그려준다.
}
}
}
#endif // WITH_EDITOR1. 오류가 발생한 부분의 코드들을 다시 변경해서 채워준다.

1. 중요한 점은 BeginPlay에서 객체를 생성하고 return할 수 있도록 매개변수를 추가해준다.
2. 생성 후 return 해주기 때문에 더블 포인터를 사용한다.
3. WeaponAsset.cpp에 코드처럼 BeginPlay에 더블 포인터로 받는 매개변수를 가져다가 갑들을 다 채워준다.
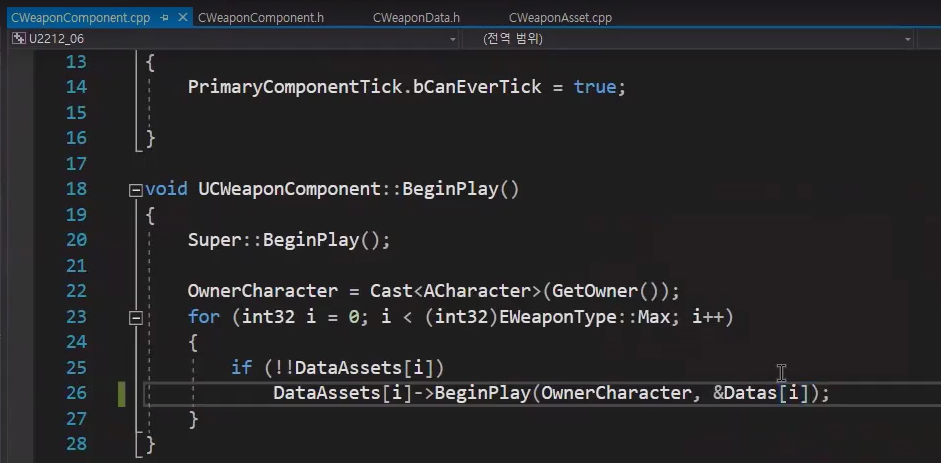


1. 함수에서 바뀐 객체들을 변경시켜준다.
#pragma once

#include "CoreMinimal.h"
#include "Components/ActorComponent.h"
#include "CWeaponComponent.generated.h"

// 무기 타입
UENUM(BlueprintType)
enum class EWeaponType : uint8
{
	Fist, Sword, Hammer, Warp, Around, Bow, Max,
};
DECLARE_DYNAMIC_MULTICAST_DELEGATE_TwoParams(FWeaponTypeChanged, EWeaponType, InPrevType, EWeaponType, InNewType);

UCLASS(ClassGroup = (Custom), meta = (BlueprintSpawnableComponent))
class U2212_06_API UCWeaponComponent : public UActorComponent
{
	GENERATED_BODY()

public:
	class ACAttachment* GetAttachment(); // 내부, 외부 둘다 사용하기 위해 생성.
	class UCEquipment* GetEquipment();
	class UCDoAction* GetDoAction();
	class UCSubAction* GetSubAction();

private:
	void SetMode(EWeaponType InType); // 모드 확인

private:
	EWeaponType Type = EWeaponType::Max;

private:
	// 이제 통합된게 아닌 분리되었기 때문에 실제로 저장된 데이터가 있어야한다.
	UPROPERTY() // 가비지가 삭제하므로, UPROPERTY 붙여줘서 막아주기
		class UCWeaponData* Datas[(int32)EWeaponType::Max]; // 생성된 데이터

};
#include "Components/CWeaponComponent.h"
#include "Global.h"
#include "CStateComponent.h"
#include "GameFramework/Character.h"
#include "Weapons/CWeaponAsset.h"
#include "Weapons/CWeaponData.h"
#include "Weapons/CAttachment.h"
#include "Weapons/CEquipment.h"
#include "Weapons/CDoAction.h"
#include "Weapons/CSubAction.h"
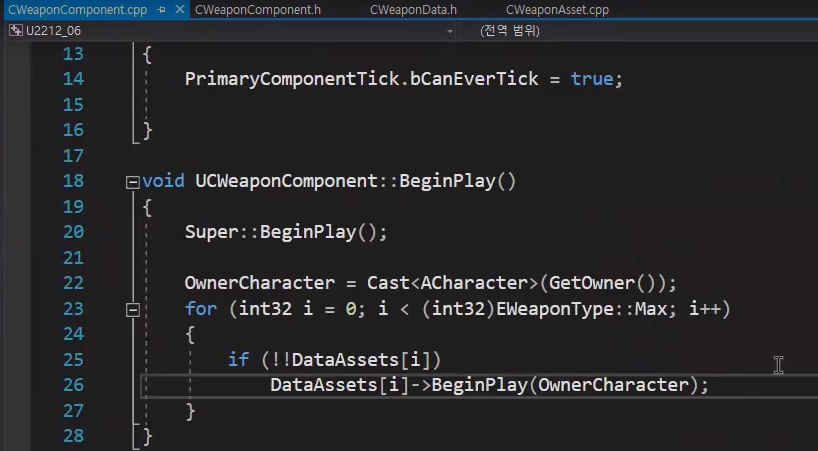
void UCWeaponComponent::BeginPlay()
{
Super::BeginPlay();
OwnerCharacter = Cast<ACharacter>(GetOwner());
for (int32 i = 0; i < (int32)EWeaponType::Max; i++)
{
// CWeaponAsset에 있는 Begin_Play 불러오기
if (!!DataAssets[i])
DataAssets[i]->BeginPlay(OwnerCharacter, &Datas[i]); // 콜해줌으로써 Sword가 생성된다.
}
}
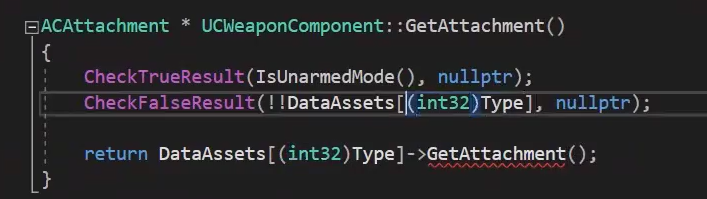
ACAttachment* UCWeaponComponent::GetAttachment()
{
CheckTrueResult(IsUnarmedMode(), nullptr); // 무기가 장착이 아닌 상태 체크
CheckFalseResult(!!Datas[(int32)Type], nullptr);
return Datas[(int32)Type]->GetAttachment();
}
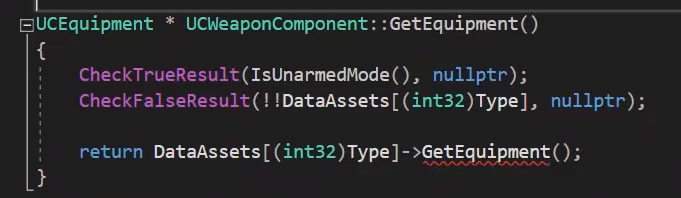
UCEquipment* UCWeaponComponent::GetEquipment()
{
CheckTrueResult(IsUnarmedMode(), nullptr);
CheckFalseResult(!!Datas[(int32)Type], nullptr);
return Datas[(int32)Type]->GetEquipment();
}
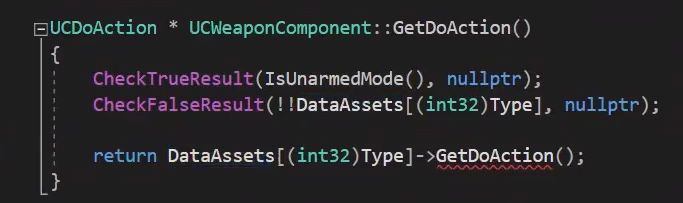
UCDoAction* UCWeaponComponent::GetDoAction()
{
CheckTrueResult(IsUnarmedMode(), nullptr);
CheckFalseResult(!!Datas[(int32)Type], nullptr);
return Datas[(int32)Type]->GetDoAction();
}
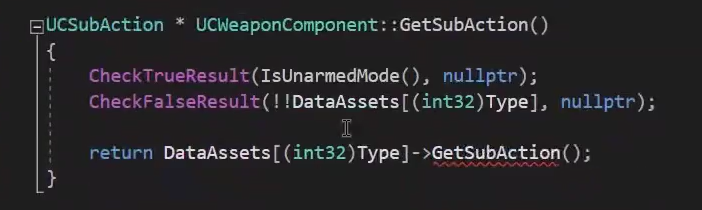
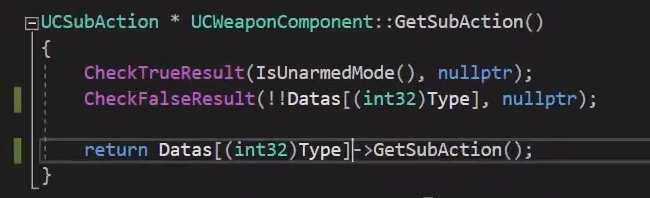
UCSubAction* UCWeaponComponent::GetSubAction()
{
// 현재 선택된 무기 return
CheckTrueResult(IsUnarmedMode(), nullptr);
CheckFalseResult(!!Datas[(int32)Type], nullptr);
return Datas[(int32)Type]->GetSubAction();
}
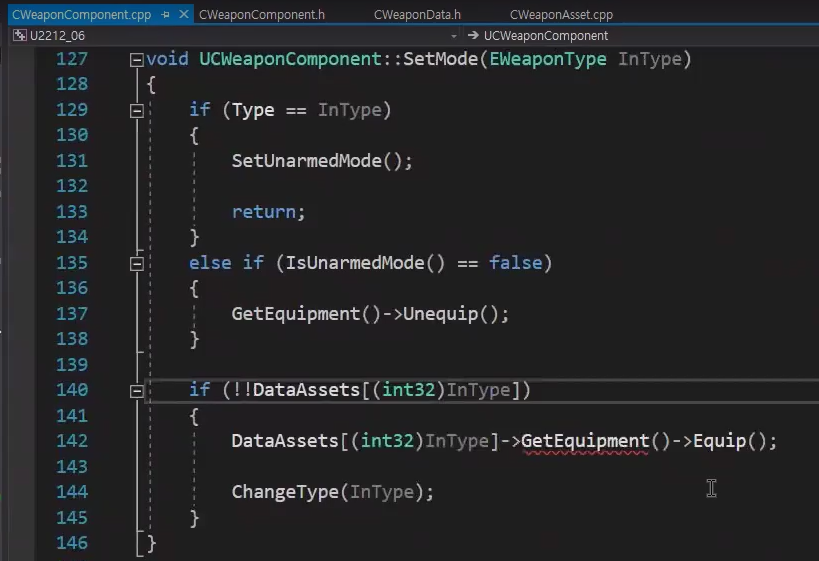
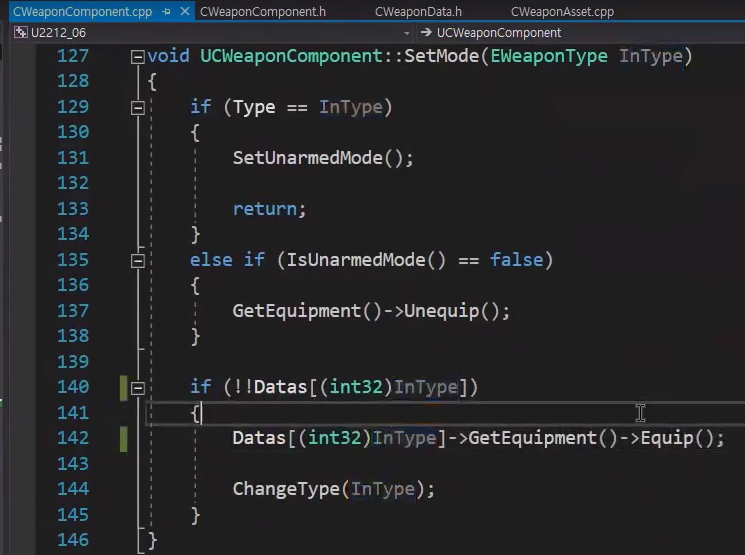
void UCWeaponComponent::SetMode(EWeaponType InType)
{
if (Type == InType)
{
SetUnarmedMode(); // 타입이 같다면 해제이므로 UnarmedMode
return;
}
else if (IsUnarmedMode() == false)
{
GetEquipment()->Unequip(); // UnarmedMode가 아니라면 그걸 해제하고 다른걸 장착
}
if (!!Datas[(int32)InType])
{
Datas[(int32)InType]->GetEquipment()->Equip();
ChangeType(InType);
}
}1. 변경된 전체적인 CWeaponComponent 코드.
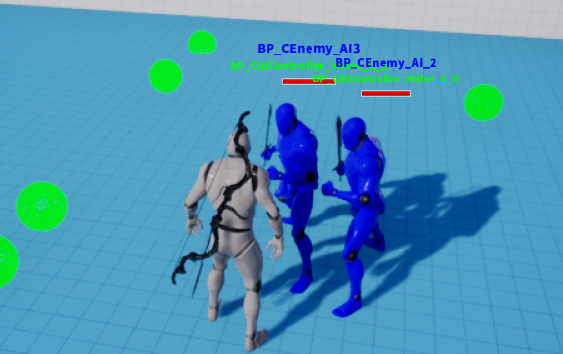
1. 이제 Enemy가 Equip 행동을 할 시 Player에서 뽑히는 현상 및 다른 버그들이 사라지고 정상적으로 작동하는 모습을 확인할 수 있다.
#pragma once

#include "CoreMinimal.h"
#include "UObject/NoExportTypes.h"
#include "Weapons/CWeaponStructures.h"
#include "CDoAction.generated.h"

UCLASS(Abstract) // 객체화 되면 안되므로 Abstract
class U2212_06_API UCDoAction : public UObject
{
	GENERATED_BODY()

public:
	FORCEINLINE bool GetInAction() { return bInAction; }

protected:
	bool bInAction;

};
1. DoAction에서 Action을 통제시켜줄 변수를 함수로 만들어서 가져온다.
이제는 무기를 뽑았으니 공격행동을 하도록 만들어 볼 것이다.
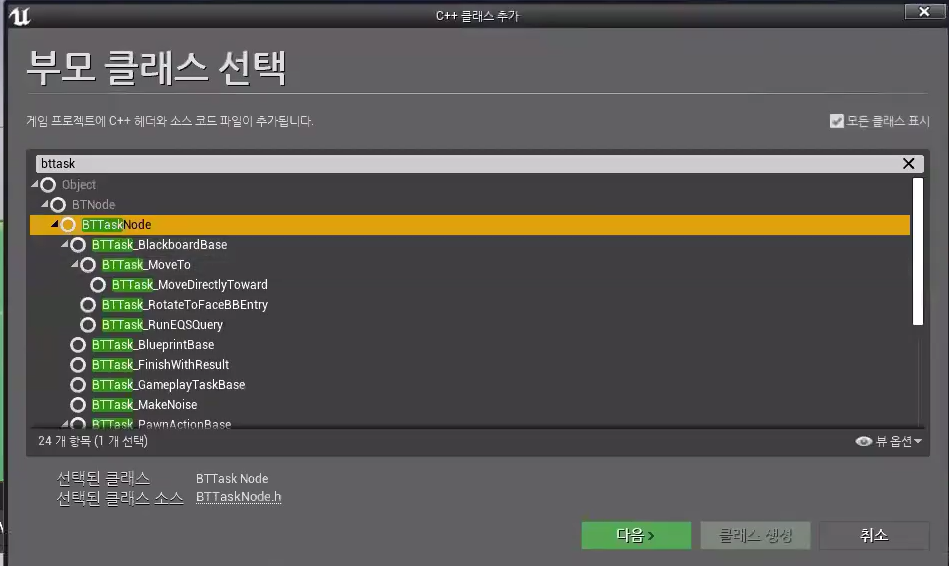
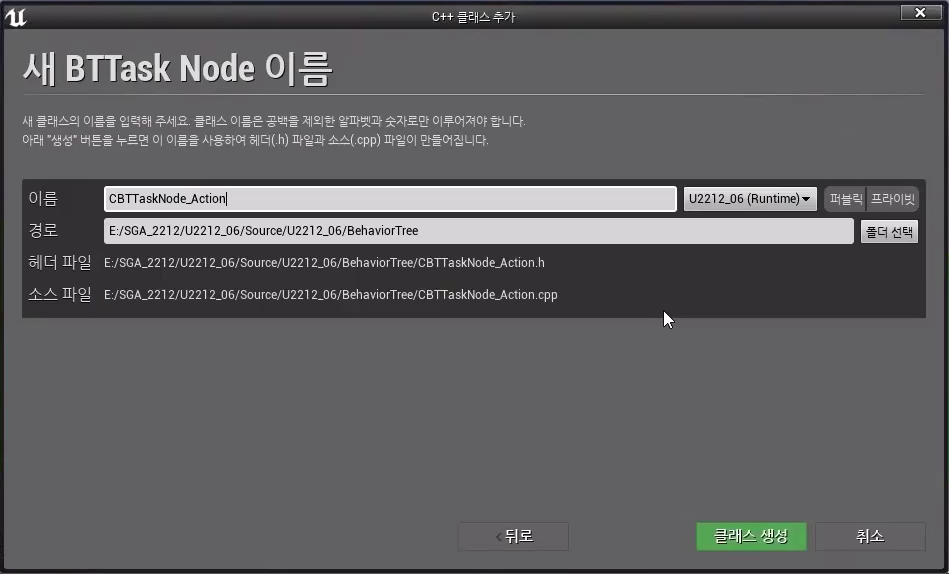
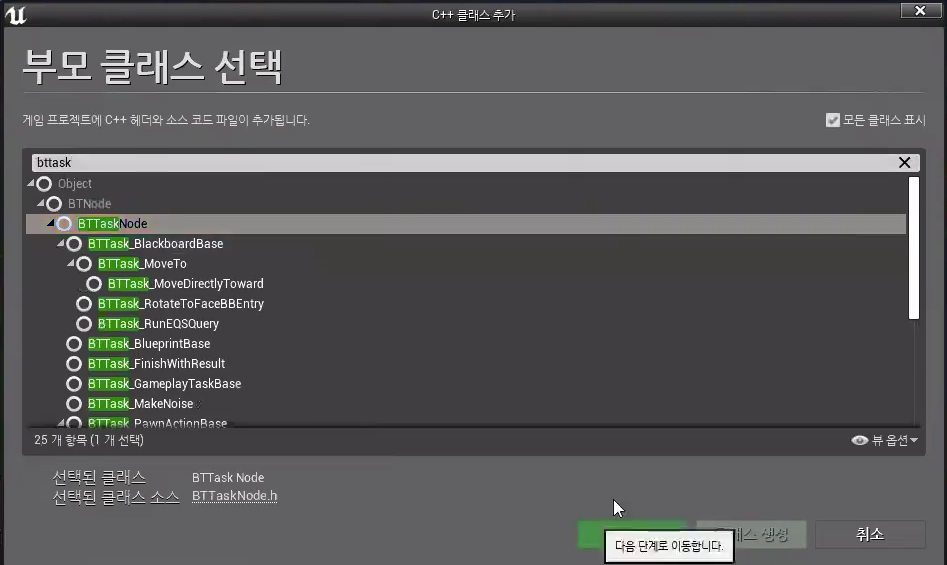
1. Action Task를 생성해준다.
#pragma once

#include "CoreMinimal.h"
#include "BehaviorTree/BTTaskNode.h"
#include "CBTTaskNode_Action.generated.h"

UCLASS()
class U2212_06_API UCBTTaskNode_Action : public UBTTaskNode
{
	GENERATED_BODY()
public:
	UCBTTaskNode_Action();

protected:
	virtual EBTNodeResult::Type ExecuteTask(UBehaviorTreeComponent& OwnerComp, uint8* NodeMemory) override;
	virtual void TickTask(UBehaviorTreeComponent& OwnerComp, uint8* NodeMemory, float DeltaSeconds) override;

};
#include "BehaviorTree/CBTTaskNode_Action.h"
#include "Global.h"
#include "Characters/CEnemy_AI.h"
#include "Characters/CAIController.h"
#include "Components/CStateComponent.h"
#include "Components/CWeaponComponent.h"
#include "Weapons/CDoAction.h"
UCBTTaskNode_Action::UCBTTaskNode_Action()
{
NodeName = "Action";
bNotifyTick = true;
}
EBTNodeResult::Type UCBTTaskNode_Action::ExecuteTask(UBehaviorTreeComponent& OwnerComp, uint8* NodeMemory)
{
Super::ExecuteTask(OwnerComp, NodeMemory);
ACAIController* controller = Cast<ACAIController>(OwnerComp.GetOwner());
ACEnemy_AI* ai = Cast<ACEnemy_AI>(controller->GetPawn());
UCWeaponComponent* weapon = CHelpers::GetComponent<UCWeaponComponent>(ai);
CheckNullResult(weapon, EBTNodeResult::Failed);
// 공격시 제자리에 멈춰서 액션을 취하도록,
controller->StopMovement();
weapon->DoAction();
return EBTNodeResult::InProgress;
}
void UCBTTaskNode_Action::TickTask(UBehaviorTreeComponent& OwnerComp, uint8* NodeMemory, float DeltaSeconds)
{
Super::TickTask(OwnerComp, NodeMemory, DeltaSeconds);
ACAIController* controller = Cast<ACAIController>(OwnerComp.GetOwner());
ACEnemy_AI* ai = Cast<ACEnemy_AI>(controller->GetPawn());
UCWeaponComponent* weapon = CHelpers::GetComponent<UCWeaponComponent>(ai);
UCStateComponent* state = CHelpers::GetComponent<UCStateComponent>(ai);
bool bCheck = true;
bCheck &= (state->IsIdleMode()); // &= 둘다 참이라는 의미
bCheck &= (weapon->GetDoAction()->GetInAction() == false);
// bCheck가 true 액션이 false라면 조건에 성립
if (bCheck)
{
FinishLatentTask(OwnerComp, EBTNodeResult::Succeeded);
return;
}
}1. bool 변수를 하나 생성 후, 넘겨받은 변수를 가지고 조건을 체크해준다.
2. 조건이 맞다면 Action 동작을 취할수 있도록 설정.
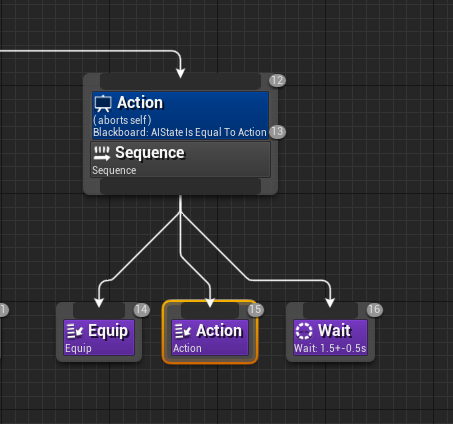
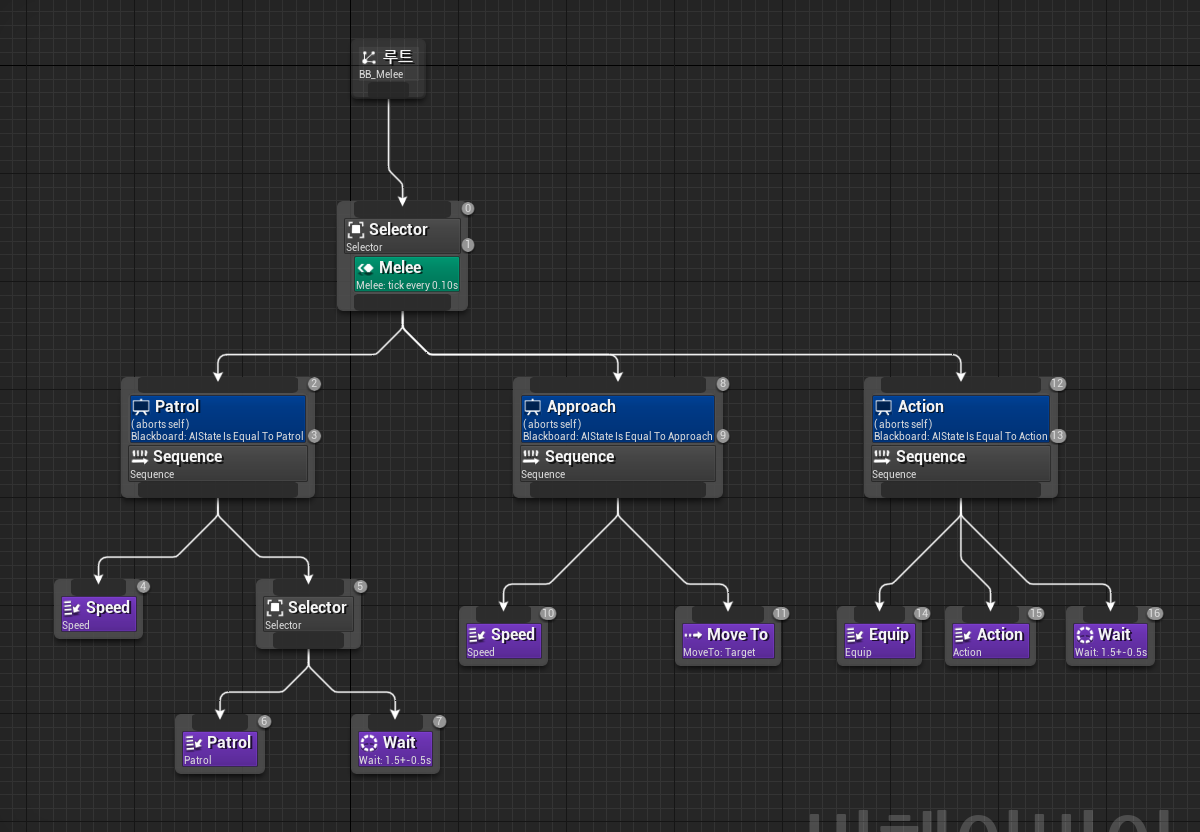
1. Action Task를 연결시켜준다.
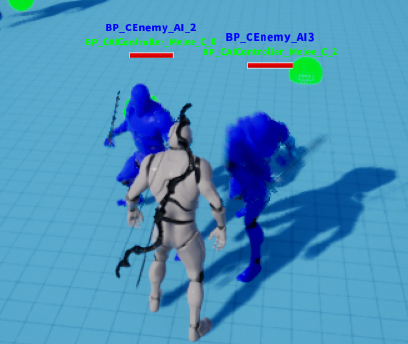
1. Enemy가 이제 Player가 보이게되면 무기를 뽑고 공격을 하는 모습을 확인할 수 있다.
이제는 Enemy가 공격을 했을시 Player에 Hit 반응이 일어나도록 만들어 볼 것이다.
우선 클래스만 생성해주고 마무리 할 것이다.

#pragma once

#include "CoreMinimal.h"
#include "BehaviorTree/BTTaskNode.h"
#include "CBTTaskNode_Hitted.generated.h"

UCLASS()
class U2212_06_API UCBTTaskNode_Hitted : public UBTTaskNode
{
	GENERATED_BODY()


};
#include "BehaviorTree/CBTTaskNode_Hitted.h"1. 만들어만 두고 마무리.
https://www.youtube.com/watch?v=i_HjaZt-9Wc
'언리얼' 카테고리의 다른 글
| UE4 Behavior, AI Equip (0) | 2023.08.03 |
|---|---|
| UE4 Behavior, AI Hitted (0) | 2023.07.31 |
| UE4 Behavior, AI Equip (0) | 2023.07.26 |
| UE4 Behavior Tree, Patrol (0) | 2023.07.25 |
| UE4 Behavior Tree (0) | 2023.07.24 |


